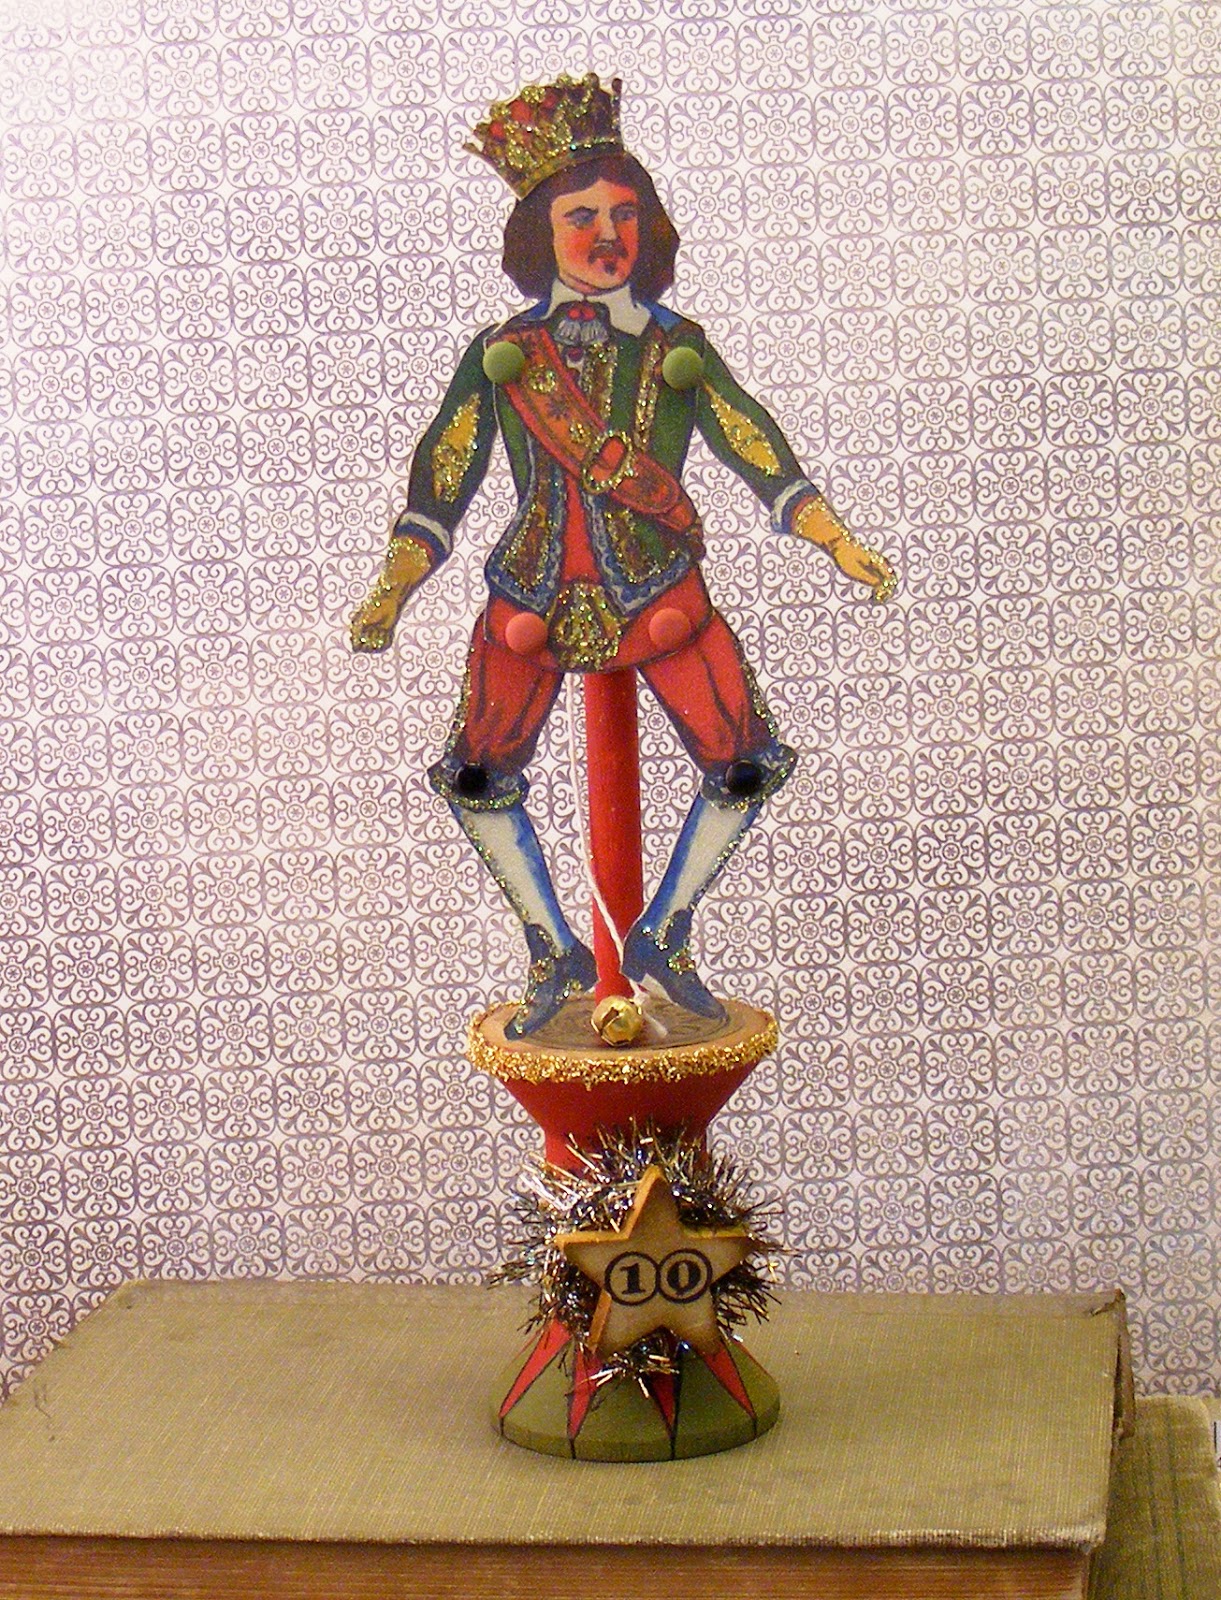
Friday, March 15, 2013

For the love of wire

I have become a huge fan of Amy Duncan's blog, Four Corners Design.  She's had many posts that just made my jaw drop.  The first one was how to make wire baskets from hardware cloth (here).  I commented back in September how much I wanted to try this out, got around to it in January, and am now finally posting it here in March.

Back in September I was looking for vintage wire baskets to add to the doors that hide the furnace in the studio.  I couldn't find anything the right size and shape.  Following Amy's directions I made the size that that made me happy.


Then in February Amy blogged again with an idea to make a her own wire cloche (here) and as I read the post I remembered all the square scraps I had left over from the baskets.  

They make the cutest little wire cages... now what to do with them?

Still haven't figured that out, but I did make some square ones too.


Thanks Amy for the fantastic inspiration and tutes!

Thursday, February 7, 2013

Generosity

Do ever find it a struggle to create in the winter months? Oh gosh I do. Made my way into the studio only a handful of times since Christmas but haven't had much passion when I'm in there.  I did do a little reorganizing but that it...nothing else...nada.

I want to share something that is filling my creative gap.  Just after the New Year I was offered a  position at The Brighton Center. It is a non-profit organization that offers a variety of services to the eight counties in Northern Kentucky.  Housed within the organization is a thrift store that provides low cost clothing and household items, as well a free clothing to those in need.  All this is done by donations, not just donated items but also of time.  My position is as a Donations Specialist, I work between both the thrift store and the lower level that processes the donations.  The system works well but with my merchandising experience the Donations Manager was thinking I could offer up suggestions and improvements to way they do things.  Everyday is a new experience, We've been able to implement a few small changes and some larger plans are in the works for the next few months.  

Everyday I'm amazed at the generosity that flows through the organization.  I wanted to give you a peek into one day this week.  In the lower level where donations are processed I've been thinking endlessly on a better way to organize hangers.  After a sale in the thrift store all hangers are tossed into large bins and sent to the lower lever, from there the mixed hangers would be sorted by volunteers into more plastic tubs to be available for hanging clothes.  Endless tubs of hangers tangled together seemed to frustrate everyone.  Desperate to find some kind of low cost (more like almost free) method/contraption to sort hangers on I had an idea of pvc pipes fed through classic wire cube organizers.  You can see it in the picture below on the right side.  The same day I brought in my contraption, a large group of ten employees from UPS came into volunteer a few hours. 


We decided with such a large group we'd make a huge dent in the pile of donations, move around some tables, and implement the new hanger sorter.  They started right in loading it up, it had definite flaws and it was obvious it wasn't large enough.  Two engineers from UPS jumped in feet first and took it upon themselves to come up with a better solution.  They asked all sorts of questions then disappeared.  I come back from lunch to see these two feverishly working out their plan for a permanent fixture to suit all our needs.  They got the wood, they had the tools, and the know-how.


All the while the remaining eight UPS employees plowed through a huge pile of donated clothing, sorting and hanging.  In the end I was almost out of tasks for them to complete...we were caught up.  Amazing!

Here is the finished product of our brilliant volunteers.  It is exactly what I would have made if I had the time, money, and talent.  I am in awe of this group, their integrity, their dedication, and their initiative.

This is one day at Brighton Center. Love, love, love it.

Saturday, December 22, 2012

Days 11 & 12

Just wanted to follow up with the last two posts for the 12 Days of Christmas projects at Simply Homemade
  I think I'm in love!

11 Pipers Piping  by Lauren Zabaneh

11 pipers piping!

and finally

12 Drummers Drumming by Jo Neville

12 drummers drumming!

These 12 how-to projects have been fantastic, really enjoyed each and everyone.  Not to mention I now have more blogs to follow.

Tomorrow, if I can find batteries for the camera I have a little stocking swap to share!
Angie

Thursday, December 20, 2012

And the winners are...

Blessings from Cindy, Kim, and Sarah

Thank you ladies for playing along!!

Wednesday, December 19, 2012

10 Lords A-Leaping


Ten Lords a-Leaping 

In Victorian times paper dolls called Jumping Jacks or French “Pantin” were a popular toy.  Children would cut out each piece of the puppet, assemble the joints then string would be tied together to make the arms and legs to dance about.
This puppet came to mind when working on a the 12 Days of Christmas Project:
A 10 Lords a-Leaping Pantin.   

Supplies:


Empty Wooden Thread Spool
6” Dowel
Acrylic Paints (red & green)
Wooden star
Double sided tape
Gold glitter
Black ink
Black fine tip marker
Tinsel string
Foam pop- dots
Espresso Alcohol ink
Small poly bag
Small number stamps
Brads
String
Small bell
Print copy of the paper doll & crown (provided) on heavy cardstock
Scissors
To make the base:


Paint green triangles around bottom of spool. Paint the rest of the spool red. When dry even out the look of the green triangles with a black marker.  Run a strip of double sided tape around top edge of spool, expose tape and glitter.  Run 2 additional bands of tape around center of spool and glitter.
Cut a 4” piece of tinsel string and place in poly bag.  Add about 6 drops of espresso alcohol ink into bag, seal bag and press ink into tinsel. Once coated take tinsel from bag and set aside to dry.

Stamp wooden star with “10”. Place a foam pop-dot on back of star and place on center of spool. Take the colored tinsel and wrap around pop dot behind the star.
Paint dowel with red paint, when dry add glue and place into spool.

To make the puppet:
For assembly of the puppet I found it easier to explain by including this excellent picture and directions from the website:
http://www.ekduncan.com/


Once assembled, embellish the puppet with glitter.  To attach the puppet to the dowel stick, use foam pop-dots on back of head and body.  Add a bell to the end of the string, and make your Lord leap and dance.

It was an honor to participate and I can't wait to see what the next 2 days projects will be!

Don't forget about the cone ornament giveaway, I will be drawing names on the 20th!

Tuesday, December 18, 2012

Days 5-9

I paused a few days to take care of family business, the boy turned 12 this weekend so a family dinner was in order.  Etsy sales have been swift (thank you so much).  Lastly the tragedy in Connecticut saddened me so much I chose to take a few days to stay quiet and reflect on what we hold dear.

Today I would like to catch you all up of the 12 Days of Christmas crafting projects from Simply Homemade.  Tomorrow is my day so be sure to pop back in.  The day after that I will do the cone ornament giveaway, so be sure to click on the giveaway button to the right and leave a comment to be entered in.


by Charlotte of Gin Fuelled Blue Stocking

6 geese a-laying!
Yummy recipes by Lex Smith of Lady Nom

Lauren Engelkemeyer of Clever Betty

Kendall, Kate & Emily from Trends With Benefits 

and finally caught up with 
9 ladies dancing!

Thanks for stopping in.


Friday, December 14, 2012

Christmas Ornament Giveaway

Earlier in the week I rediscovered six cone ornaments made last year. With the hustle and bustle of mid-December I decided it was too late to list them in the shop, so how about a Christmas giveaway?  I bundled them in pairs and will draw three names on December 20th.  To enter just leave a comment on this post.